Terraform Associate Certification: Hashicorp Certified
Table of Contents
UNDERSTANDING IAC
- Configuration Management:
Ansible,Puppet- Installing and manage software on existing infrastructure
- Idempotent: Check if it is already there
- Post provisioning tasks
- Server Templating:
Docker,Vagrant- Build a custom image
- Immutable infrastructure
- Provisioning Tools:
Terraform,CloudFormation- Orchestration tools
- Deploy immutable infrastructure resources
- Multiple providers
Which IaC Tools Should I Use?
Ansible: Procedural tool. More code to delete already created infrastructure Terraform: Declarative
Installing Terraform
Official documentation Here
# Up to date
sudo apt-get update && sudo apt-get install -y gnupg software-properties-common
# GPG Key
wget -O- https://apt.releases.hashicorp.com/gpg | \
gpg --dearmor | \
sudo tee /usr/share/keyrings/hashicorp-archive-keyring.gpg > /dev/null
# Repository
echo "deb [arch=$(dpkg --print-architecture) signed-by=/usr/share/keyrings/hashicorp-archive-keyring.gpg] https://apt.releases.hashicorp.com $(grep -oP '(?<=UBUNTU_CODENAME=).*' /etc/os-release || lsb_release -cs) main" | sudo tee /etc/apt/sources.list.d/hashicorp.list
# Update
sudo apt update
# Install
sudo apt-get install terraform
HCL: Declarative language
resource "local_file" "pet" {
  filename = "/root/pets.txt"
  content = "We love pets!"
}
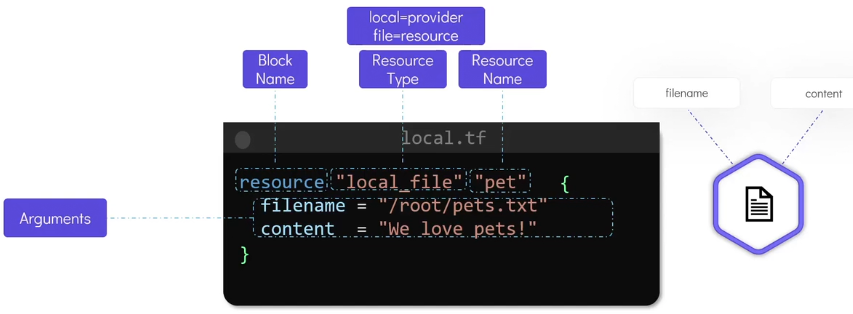
Resource: Object that terraform manage
terraform init: Making use of the local provider. Download plugins.terraform plan: Created to reviewterraform -out=abc: Created to review and saved inabcfileterraform apply: Proceed of the creationterraform apply -auto-approve: Proceed of the creation and auto approveterraform show: Details of the resources we’ve just created. Command is used to inspect the current state file in Terraformterraform output: See all the outputs
Providers - Resources - Arguments
Update and Destroy Infrastructure
resource "local_file" "pet" {
  filename = "/root/pets.txt"
  content = "We love pets!"
  file_permission = "0700" # <--- New Line
}
terraform planterraform applyterraform destroyorterraform destroy - target=azurerm_resource_group.productionterraform destroy -auto-approveterraform version: See providers versions
| File Name | Purpose |
|---|---|
main.tf | Main configuration file containing resource definition |
variables.tf | Contains variable declarations |
outputs.tf | Contains outputs from resources |
providers.tf | Contains Providers definitions |
terraform.tf | Configure Terraform behaviour |
BASICS
terraform init: Install plugins- Providers: We can find them Here
- Official providers
- Partner: Third party. But tested by Hashicorp
- Community: Individual contributors
reosurce "random_string" "server-suffix" {
  length = 6
  upper = false
  special = false
}

resource "aws_instance" "web" {
  ami = "ami-0648574c"
  instance_type = "m5.large"
  tags = {
    Name = "web-${random_string.server-suffix.id}"
  }
}
Version Constraints
Make use of a specific version of a provider
Terraform block:
# main.tf

terraform {
  required_providers {
    local = {
      source = "hashicorp/local"
      version = "2.5.3"
      # version = "> 1.2.0, < 2.0.0, != 1.4.0"
      # version = "~> 1.2.0" # Can be 1.2.1 - 1.2.9
    }
  }
}
Aliases
resource "aws_key_pair" "alpha" {
  key_name = "alpha"
  public_key = "ssh-rsa AAAAAB3Nzac@a-server"
}

resource "aws_key_pair" "beta" {
  key_name = "beta"
  public_key = "ssh-rsa AAAB3NzaC1"
  provider = aws.central # <---------------
}
provider "aws" {
  region = "us-east-1" # This is the default
}

provider "aws" {
  region = "ca-central-1"
  alias = "central" # <--------------------
}
VARIABLES, RESOURCES, ATTRIBUTES AND DEPENDENCIES
Variables
# main.tf
resource "local_file" "pet" {
  filename = var.filename
  content = var.content
}

resources "random_pet" "my-pet" {
  prefix = var.prefix
  separator = var.separator
  length = var.length
}
# variables.tf
variables "filename" {
  default = "/root/pets.txt"
}
variables "content" {
  default = "We love pets!"
}
variables "prefix" {
  default = "Mrs"
}
variables "separator" {
  default = "."
}
variable "length" {
  default = "1"
}
In case of using
variable "ami" {

}
variable "instance_type" {

}
We will pre prompted to enter a value:
$ terraform apply
var.ami
  Enter a value: xxxxxxxxxx
Another way of passing values:
$ terraform apply -var "ami=ami-0edad5" -var "instance_type=t2.micro"
Using environment variables
export TF_VAR_instance_type="t2.micro"
terraform apply
We need to use TF_VAR_[Variable-Name]
Using variable definition Files variable.tfvars
# variable.tfvars
ami="ami-0eda34fsd"
instance_type="t2.micro"
and then
terraform apply -var-file variable.tfvars
These names will be automatically loaded by Terraform (Do not need -var-file)
terraform.tfvarsterraform.tfvars.json*.auto.tfvars*.auto.tfvars.json
Variable definition precedence
The highest priority is 4 and lowest is 1
| Order | Option |
|---|---|
| 1 | Environment Variable |
| 2 | terraform.tfvars |
| 3 | *.auto.tfvars (alphabetical order) |
| 4 | -var or -var-file (command line flags) |
Using Variables
# variables.tf
variable "ami" {
  default = "ami-0eda"
  description = "Type of AMI"
  type = string
  sensitive = true
}
We can have a validation block
variable "ami" {
  type = string
  description = "The ID"
  validation {
    condition = substr(var.ami, 0, 4) == "ami-"
    error_message = "The AMI should start with \"ami-\"."
  }
}
Build in function: substr
| Type | Example |
|---|---|
| string | “/root/pets.txt” |
| number | 1 |
| bool | true/false |
| any | Default Value |
| list | [“web1”,“web2”] |
| map | region1 = us-east-1 region2 = us-west-2 |
| object | Complex Data Structure |
| tuple | Complex Data Structure |
NOTE: Terraform will try to convert to the type that is specified |
List
variable "servers" {
  default = ["web1", "web2", "web3"]
  type = list(string)
  # If they were numbers we could use type = list(number)
}
resource "aws_instance" "web" {
  ami = var.ami
  instance_type = var.instance_type
  tags = {
    name = var.servers[0]
  }
}
Map
Key/Value pairs
variable instance_type {
  type = map(string)
  default = {
    "production" = "m5.large"
    "development" = "t2.micro"
  }
}
variable "server_count" {
  default = {
    "web" = 3
    "db" = 1
    "agent" = 2
  }
  type = map(number)
}
resource "aws_instance" "production" {
  ami = var.ami
  instance_type = var.instance_type["development"]
  tags = {
    name = var.servers[0]
  }
}
Set
Similar to list but can not have duplicates
varialbe "prefix" {
  default = ["web1", "web2", "web2"]
  type = set(string)
}
# This will cause an ERROR!!!!!!!!!!
Objects
Complex data structure
variable "bella" {
  type = object({
    name = string
    color = string
    age = number
    food = list(string)
    favorite_pet = bool
  })

  default = {
   name = "bella"
   color = "brown"
   age = 7
   food = ["fish", "chicken", "turkey"]
   favorite_pet = true
  }
}
Tuple
Similar to a list but can use different variable types.
variable web {
  type = tuple([string, number, bool])
  default = ["web1", 3, true]
}
Output Variables
Can be used to store the value of the expression in terraform
resource "aws_instance" "cerberus" {
  ami = var.ami
  instance_type = var.instance_type
}

output "pub_ip" {
  value = aws_instance.cerberus.public_ip
  description = "Print the public IPv4 address"
}
Will be displayed after we terraform apply
$ terraform apply
Outputs:
pub_ip = 54.214.145.69
We can also see all by using terraform output or filter it by using terraform output pub_ip
Sensitive Information
variable "ami" {
  default = "ami-jfdfd34"
  sensitive = true
}
Terraform will no display it on the output nor logs. And also won’t be seen in “Enter a value” phase. Marked it as sensitive.
Can also use a -var-file=secrent.tfvars or using an environment variable such as TF_VAR_ami
Terraform will display an error if the sensitive information is being exposed, such as using output for example
output "info_string" {
  description = "Information"
  value = "AMI=${var.ami}, Instance Type=${var.instance_type}"
  sensitive = true
}
sensitive = true provides an additional layer of security
In case we really need to view it
terraform output info_string
We can specifically output the sensitive data
Resource Attributes and Dependencies
Upon creation of a resource, Terraform exports several attributes.
terraform show: Those attributes can be seen with that command
resource "aws_key_pair" "alpha" {
  key_name = "alpha"
  public_key = "ssh-rsa AAAAB3Nza"
}
$ terraform show
# aws_key_pair.alpha
arn = ...
fingerprint = ...
id = ...
key_name = ...
public_key = ...
Those attributes can be used as reference by other resources:
resource "aws_instance" "cerberus" {
  ami = var.ami
  instance_type = var.instance_type
  key_name = aws_key_pair.alpha.key_name # <-------------
}
<RESOURCE_TYPE>.<RESOURCE_NAME>.<ATTRIBUTE>
By default Terraform will try to create all resources in parallel. However, we need a dependency in this case. Implicit dependency, will be used because Terraform will automatically understand the attribute reference.
There is another way:
resource "aws_instance" "db" {
  ami = var.db_ami
  instance_type = var.web_instance_type
}
resource "aws_instance" "web" {
  ami = var.web_ami
  instance_type = var.db_instance_type
  depends_on = [
    aws_instance.db
  ]
}
Meta Argument:* depends_on this is a Explicit dependency
Resource Targetting
What if we want to only change a specific thing:
terraform apply -target random_string.server-suffixChanges will only be applied on the resource named:random_string.server-suffix
Resource Renaming (Move Block)
Considering:
resource "aws_instance" "a" {
  count = 2

  # (resource-type-specific configuration)
}
If you later choose a different name for this resource, then you can change the name label in the resource block and record the old name inside a moved block:
resource "aws_instance" "b" {
  count = 2

  # (resource-type-specific configuration)
}

moved {
  from = aws_instance.a
  to   = aws_instance.b
}
Before creating a new plan for aws_instance.b, Terraform first checks whether there is an existing object for aws_instance.a recorded in the state. If there is an existing object, Terraform renames that object to aws_instance.b and then proceeds with creating a plan.
Import Block
The import block imports existing infrastructure resources into Terraform. You can add an import block to any Terraform configuration file, but we recommend either creating an imports.tf
import {
  to = TYPE.LABEL
  id = "<RESOURCE-ID>"
}

resource "<TYPE>" "<LABEL>" {
  #
}
- The
toargument specifies the instance address to import the resource into. - The
idargument specifies the cloud provider’s ID for the resource you want to import. - The
identityargument specifies a resource identity object that uniquely identifies a resource.
import {
  identity = {
    <KEY> = <VALUE>
  }
}
Data Sources
Documentation: Here
Cases where resources already exists.
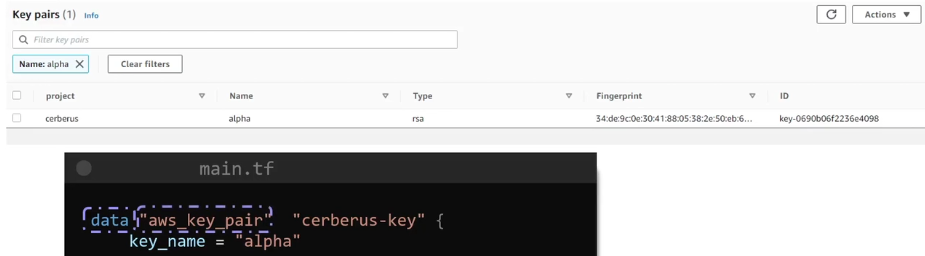
data "aws_key_pair" "cerberus-key" {
  key_name = "alpha" # Uniquely identifies the key
}

resource "aws_instance" "cerberus" {
 ami = var.ami
 instance_type = var.instance.type
 key_name = data.aws_key_pair.cerberus-key.key_name # <-----
}
Other ways to identify this time by usng filter:
data "aws_key_pair" "cerberus-key" {
  filter = {
    name = "tag:project"
    values = ["cerberus"]
  }
}
| Resources | Data Source |
|---|---|
| Creates, Updates, Destroys Infrastructure | Only Reads Infrastructure |
| Also called Managed Resources | Also called Data Resources |
TERRAFORM STATE
When a resource is created after a terraform apply command. A state file is created terraform.tfstate and terraform.tfstate.backup on the same directory of the configuration files.
It is a JSON data structure. Every little detail is contained. It is a source of truth.
After a terraform plan the terraform.tfstate is refreshed. This can be bypassed by using terraform apply -refresh=false
The state file contains information about the resources managed by Terraform, not the variables used in the configuration. Therefore, the variable name cannot be found in the state file for easy searching
Sensitive Data is contained in the terraform.tfstate so it should not be included on Version Control such as GitHub
Remote State
Since local state file is not secure nor a good idea. It is not ideal for collaboration neither.
- State locking:
Terraformuse it to avoid corruption to the state file.
That is why it is ideal to use Remote State BackendUsually S3 Bucket is used.
- Remote Backend: Bucket:
Terraform Stateand DynamoDB:State Locking
| Object | Value |
|---|---|
| Bucket | kodekloud-terraform-state-bucket01 |
| Key | finance/terraform.tfstate |
| Region | us-west-1 |
| DynamoDB Table | state-locking |
# terraform.tf
terraform {
  backend "s3" {
    bucket = "kodekloud-terraform-state-bucket01"
    key = "finance/terraform.tfstate"
    region = "us-west-1"
    dynamodb_table = "state-locking"
  }
}
But we need to initialize again with terraform init
terraform init -migrate-state
Differentiate Remote State Backends in Terraform
A State file:
- Map real-world resources
- Keep track of metadata
- Improve performance
Why use remote state backend:
- Team collaboration
- Security
- Realiability
Running terraform init -migrate-state is the correct command to migrate the state file to the new Amazon S3 remote backend. This command initializes the backend configuration and migrates the existing state to the specified backend.
Flags
-backend-config=PATH: Flag to specify a separate config file enables users to store sensitive information in a dedicated file that can be securely managed.
Types:
S3 backendAzureRM BackendGCS BackendConsul BackendArtifactory BackendHCP Terraform
Dependency Lock File
Known as Terraform.lock.hcl Ensures consistent provider versions across all environments and Terraform operations.
Helps to manage dependencies.
- Consistency: Locking providers versions
- Reproducibility: Make projects more predictable with exact version
- Compatibility Assurance
File named .terraform.lock.hcl includes:
- Exact verions
- Provider checksum
- Information
We can update the
.terraform.lock.hclby runningterraform init -upgradeto the latest acceptable version
Best practices for the Lock File:
- Commit the lock file
- Review changes
TERRAFORM CLI
Terraform Commands:
terraform validate: Validates the code.terraform fmt: Scans the code and changes it to a canonical formatterraform fmt -recursive: Same but recursiveterraform show: Show the current state of the configuration file as seen byTerraformalso can be used liketerraform show -jsonterraform providers: Shows the providersterraform output: Print out all the output variables. Can alsoterraform output pet-nameterraform apply -refresh-only: Refresh the state. SyncTerraformwith the real wordterraform apply -replace=aws_instance.web: To mark the virtual machine for replacementterraform apply -destroy: Another way for “destroy”terraform graph: Creates visual representation. Need to use a a software to view it.terraform graph -type=plan | dot -Tpng >graph.pngterraform get: Download modules from the module registry or a version control systemterraform force-unlock: command to remove the lock on the state for the current configurationterraform login: Log in. Obtain and save credentials for the remote backend
State Command
terraform state show aws_s3_bucket.finance(Example)terraform state [ list | mv | pull | rm | show | push ]terraform state list: Lists all the resourcesterraform state show aws_s3_bucket.cerberus-finance: Shows the resourceterraform state mv aws_dynamodb_table.state-locking aws_dynamoddb_table.state-locking-db: Move the resources or renaming only executed on the state file. So we would also need to change it manually on the configuration file.terraform state pull: To pull the state file from a Remote state backend. Can also add something liketerraform state pull | jq '.resources[] | select(.name == "state-locking-db")|.instances[].attributes.hash_key'terraform state rm aws_s3_bucket.finance-2020922: Used to delete items from aTerraformstate file. Also need to manual delete from configuration fileterraform state push ./terraform.tfstate: Overwrite the remote state file with a local one.
Lifecycle Rules
How creates and destroys resources.
The default procedures is to destroy a resource and then create the new one.
However, we can use lifecycle { create_before_destroy } to do the opposite.
resource "aws_instance" "cerberus" {
  ami = "ami-2158cf"
  instance_type = "m5.large"
  tags = {
    Name = "Cerberus-Webserver"
  }
  lifecycle {
    create_before_destroy = true
    # prevent_destroy = true
  }
}
There are other options such as prevent_destroy = true to simply not destroy the resource. Terraform will reject any changes during changes.
ignore_changes = [ ] will avoid Terraform to perform any change
resource "aws_instance" "cerberus" {
  ami = "ami-2158cf"
  instance_type = "m5.large"
  tags = {
    Name = "Cerberus-Webserver"
  }
  lifecycle {
    ignore_changes = [
      tags
    ]
    # ignore_changes = all #Another option
}
Terraform Taint
When running terraform apply there are resources that may fail.
This makes Terraform to mark the resource as tainted.
When terraform plan we will see a message similar to:
# aws_instance.webserver is tainted, so must be replaced
Even though it may be already created some parts of the resource. Since it is tainted Terraform will try to create it all again.
Now, there might be some occasions where we want to force a complete recreation, that is when we can use:
terraform taint aws_instance.webserver: It is like a mark where we tellTerraformto recreate it on the nextterraform plan/apply
When we terraform plan we will se the tainted message.
terraform untaint: un mark
Debugging
Log Levels: INFO, WARNING, ERROR, DEBUG, TRACE (The most verbose)
We can use export TF_LOG=TRACE for a more detailed log output.
Using export TF_LOG_PATH=/tmp/terraform.log will copy all the logs into that file.
To unset we can simply unset TF_LOG_PATH
Terraform Import
How to import existing resources.
In case of an existing EC2 instance you can import the resource into the state file
resource "aws_instance" "webserver-2" {
  #(Resource arguments)
}
We can leave it empty, then we just need to:
terraform import <resource_type>.<resource_name> <attribute>- E.g
terraform import aws_instance.webserver-2 i-026e13...
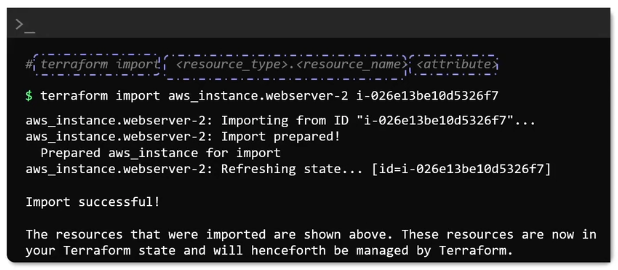
With that information we can complete the resource block manually.
The imported information is also present in terraform.tfstate so we can inspect it.
Since we are importing and incorporating the configuration on the resource block. Once we execute terraform plan we should not see any change to be made.
When importing a resource using terraform import, you need to provide both the resource address (e.g., aws_instance.web) and the resource ID (e.g., i-abdcef12345) to uniquely identify the resource being imported. This information is crucial for Terraform to manage the imported resource correctly.
Terraform Workspaces
We can use the same configuration directory to create multiple infrastructure environments.
terraform workspace list: list the workspace. By default we use thedefaultoneterraform workspace new production: Create a new workspace named productionterraform workspace select production: Switch to another workspace
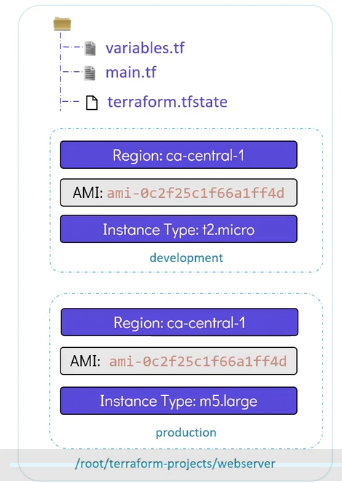
# main.tf
resource "aws_instance" "webserver" {
  ami = var.ami
  instance_type = lookup(var.instance_type, terraform.workspace)
  tags = {
    Environment = terraform.workspace
  }
}
# variable.tf
variable "ami" {
  default = "ami-24e14"
}
variable "region" {
  default = "ca-central-1"
}
variable "instance_type" {
  type = map
  default = {
    "development" = "t2.micro"
    "production" = "m5.large"
  }
}
terraform.workspace pulls the value of the workspace we are currently in.
We can validate by using:
terraform console: which will take us to console so we can do some commands
$ terraform console
> terraform.workspace
development

> lookup(var.instance_type, terraform.workspace)
t2.micro
Terraform will store the state files in separate files under terraform.tfstate.d
ls
# main.tf providers.tf terraform.tfstate.d variables.tf

ls terraform.tfstate.d
# development production
READ, GENERATE AND MODIFY CONFIGURATION
Count and For-each
meta arguments
Using count
resource "aws_instance" "web" {
  ami = var.ami
  instance_type = var.instance_type
  count = 3
}
$ terraform state list
aws_instance.web[0]
aws_instance.web[1]
aws_instance.web[2]
It will create the instances as a list of 3 in this case
We can also do this based on a variable length
variable "webservers" {
  type = list
  default = ["web1", "web2", "web3"]
}
resource "aws_instance" "web" {
  ami = var.ami
  instance_type = var.instance_type
  count = length(var.webservers)
  tags = {
    Name = var.webservers[count.index]
  }
}
We will create on each iteration:
aws_instance.web[0] = web1
aws_instance.web[1] = web2
aws_instance.web[2] = web3
Disadvantage: When deleting one value from variable default = ["web1", "web2", "web3"]
Using for_each
resource "aws_instance" "web" {
  ami = var.ami
  instance_type = var.instance_type
  for_each = var.webservers
  tags = {
    Name = each.value
  }
}
We need to use set or map
variable "webservers" {
  type = set
  default = ["web1", "web2", "web3"]
}
Another example
resource "aws_vpc" "example" {
  # One VPC for each element of var.vpcs
  for_each = var.vpcs

  # each.value here is a value from var.vpcs
  cidr_block = each.value.cidr_block
}
Now resources are create as a map of resources rather than a list
$ terraform state list
aws_instance.web["web1"]
aws_instance.web["web2"]
aws_instance.web["web3"]
Now when we remove an item from the variable default = ["web2", "web3"]
Only that corresponding resource will be removed.
Since for_each creates resources as a map, each is referenced using its key instead of an index. To get the ID of a specific one, use: aws_instance.web["web1"].id
Terraform Provisioners
Provisioners provide a way to carry out tasks such as commands or scripts on remote resources.
Using remote-exec
resource "aws_instance" "webservers" {
  ami = "ami-0eda"
  instance_type = "t2.micro"
  provisioner "remote-exec" {
    inline = [ "sudo apt update", "sudo apt install nginx -y", "sudo systemctl enable nginx", "sudo systemctl start nginx",
    ]
  }
  connection {
    type = "ssh"
    host = self.public_ip #Since we are inside the resource
    user = "ubuntu"
    private_key = file("/root/.ssh/web")
  }
  key_name = aws_key_pair.web.id
  vpc_security_group_ids = [ aws_security_group.ssh-access.id ]
}
The provisioner will run on the remote instance after it is deployed.
There should be network connectivity.
That is why we need some additional resources.
resource "aws_security_group" "ssh-access" {
  ...
}

# Authentication
resource "aws_key_pair" "web" {
  ...
}
Using local-exec
Running tasks on the local machine while we are running
resource "aws_instance" "webserver" {
  ami = "ami-sadad"
  instance_type = "t2.micro"

  provisioner "local-exec" {
    command = "echo ${aws_instance.webserver.public_ip} >> /tmp/ips.txt"
  }
}
Once the resource is create, we will be able to see the IP on our local file
cat /tmp/ips.txt
# 54.214.68.27
We can also run provisioners after a resource is destroyed
resource "aws_instance" "webserver" {
  ami = "ami-sadad"
  instance_type = "t2.micro"

  provisioner "local-exec" {
    on_failure = fail
    command = "echo Instance ${aws_instance.webserver.public_ip} created! > /tmp/instance_state.txt"
  }
  provisioner "local-exec" {
    when = destroy
    command = "echo Instance ${aws_instance.webserver.public_ip} Destroyed! > /tmp/instance_state.txt"
  }
}
on_failure = fail: Ifprovisionerfails is marked astaintedon_failure = continue: It will continue
As a recommendation, the use of native options is ideal:
resource "aws_instance" "webserver" {
  ami = "ami-sadad"
  instance_type = "t2.micro"

  user_data = <<-EOF
    #!/bin/bash
    sudo apt update
    sudo apt install nginx -y
    systemctl enable nginx
    systemctl start nginx
}
Builtin Functions
- file( ): Read data from a
file
resource "aws_iam_policy" "adminUser" {
  name = "AdminUsers"
  policy = file("admin-policy.json")
}
- length( ): Get the number of elements
resource "local_file" "pet" {
  filename = var.filename
  count = length(var.filename)
}
- toset( ): Transform a list into a set
resource "local_file" "pet" {
  filename = var.filename
  for_each = toset(var.region)
}

variable region {
  type = list
  default = ["us-east-1", "us-east-1", "ca-central-1"]
  description = "A list of AWS Regions"
}
Interactive console: terraform console
Here we can test the build-in functions
$ terraform console
> file("root/terraform-projects/main.tf")
> length(var.region)
> toset(var.region)
Numeric Functions
$ terraform console
> max (-1, 2, -10, 200, -250)
> min (-1, 2, -10, 200, -250)
> max(var.num...) # Using the expansion symbol
250
> ceil(10.1) # Output: 11
> ceil(10.9)
> floor(10.1)
String Functions
$ terraform console
> split(",", "ami-xyz,AMI-ABC,ami-efg")
# output: [ "ami-xyz", "AMI-ABC","ami-efg" ]
> split(",", var.ami)
# output: [ "ami-xyz", "AMI-ABC","ami-efg" ]
> lower(var.ami)
> upper(var.ami)
> title(var.ami) # Capital letter like a title
> substr(var.ami, 0, 7) #First and length
# output: ami-xyz
> join(",", var.ami) # List into string
>
Considering:
variable "ami" {
  type = string
  default = "ami-xyz,AMI-ABC,ami-efg" # String
  # default = ["ami-xyz", "AMI-ABC", "ami-efg"]
  description = "A string containing ami ids"
}
Collection Functions
$ terraform console
> length(var.ami)
> index(var.ami, "AMI-ABC")
# output: 1 COnsidering that 0 is the first one
> element (var.ami,2) # At index 2
# output: ami-efg
> contains(var.ami, "AMI-ABC")
# output: true because it does exist
Map Functions
variable "ami" {
  type = map
  default = { "us-east-1" = "ami-xyz",
  "ca-central-1" = "ami-efg",
  "ap-south-1" = "ami-ABC" }
  }
  description = "A map of AMI ID's for specific regions"
}
$ terraform console
> keys(var.ami) # Convert to list with just Keys
# output: ["ap-south-1", "ca-central-1", "us-east-1"]
> values(varma.ami)
# output: ["ami-ABC", "ami-efg", "ami-xyz"]
> lookup(var.ami, "ca-central-1") # Look for the value with the Key provided
# output: ami-efg
> lookup(var.ami, "us-west-2", "ami-pqr") # Use default: "ami-pqr" in case it is not found
# output: ami-pqr
Operators & Conditional Expressions
$ terraform console
> 1 + 2
3
> 8 == 8
true
> 8 > 7 && 8 < 10 # And symbol
true
8 > 9 || 8 < 10
true
> var.special
true
> ! var.special
false
variable special {
  type = bool
  default = true
  description = "Set to true to use special characters"
}
What if we want to accept a value of a password with at least 8 characters long
resource "random_password" "password-generator" {
  length = var.length < 8 ? 8 : var.length
}
output password {
  value = random_password.password-generator.result
}
variable length {
  type = number
  desciption = "The length of the password"
}
We need to use condition ? true_val : false_val
I the case of length = var.length < 8 ? 8 : var.length
- If
var.length < 8 - Then use
8in case true - Else, use
var.lengthin case is false
So if we use terraform apply -var.length=5 Terraform will still use length = 8
Local Values
If we have a repetitive values that we need to use more than one time.
We can use locals
resource "aws_instance" "web" {
  ami = "ami-095"
  instance_type = "t2.medium"
  tags = local.common_tags
}

resource "aws_instance" "db" {
  ami = "ami-0564"
  instance_type = "m5.large"
  tags = local.common_tags
}

locals {
  common_tags = {
    Department = "finance"
    Project = "cerberus"
  }
}
resource "aws_s3_bucket" "finance_bucket" {
  acl = "private"
  bucket = local.bucket-prefix
}

resource "random_string" "random-suffix" {
  length = 6
  special = false
  upper = false
}

variable "project" {
  default = "cerberus"
}

locals {
  bucket-prefix = "${var.project}-${random_string.random-suffix.id}-bucket"
}
Dynamic Blocks and Splat Expressions
Considering that we need to build this:

resource "aws_vpc" "backend-vpc" {
  cidr_block = "1.0.0.0/16"
  tags = {
    Name = "backend-vpc"
  }
}

resource "aws_subnet" "private-subnet" {
  vpc_id = aws_vpc.backend-vpc.id
  cidr_block = "10.0.2.0/24"
  tags = {
    Name = "private-subnet"
  }
}

resource "aws_security_group" "backend-sg" {
  name = "backend-sg"
  vpc_id = aws_vpc.backend-vpc.id

  ingress {
    from_port = 22
    to_port = 22
    protocol = "tcp"
    cidr_blocks = ["0.0.0.0/0"]
  }
  ingress {
    from_port = 8080
    to_port = 8080
    protocol = "tcp"
    cidr_blocks = ["0.0.0.0/0"]
  }
}
To avoid the numerous ingress inputs, we can use Dynamic Blocks
Since we want to replace the nested block ingress we need to add a dynamic "ingress" like that:
variable "ingress_ports" {
  type = list
  default = [22, 8080]
}

output "to_ports" {
  value = aws_secuirty_group.backend-sg.ingress[*].to_port
}
To iterate trough all the items on the list we can use aws_secuirty_group.backend-sg.ingress[*] the result of the output will be:
$ terraform output
to_port = [22, 8080]
resource "aws_security_group" "backend-sg" {
  name = "backend-sg"
  vpc_id = aws_vpc.backend-vpc.id

  dynamic "ingress" {
    iterator = port # We can also use this insteado of ingress.value
    for_each = var.ingress_ports
    content {
      # from_port = ingress.value # Refers to the dynamic name
      from_port = port.value # Refers to the iterator name
      # to_port = ingress.value
      to_port = port.value
      protocol = "tcp"
      cidr_blocks = ["0.0.0.0/0"]
    }
  }
}
TERRAFORM MODULE
Any directory containing Terraform configuration files is a module
- Root Module: Would be the directory where we can run
Terraformcommands
ls -la /root/terraform-projets
aws-instance
development
We can use code from other modules like this:
Considering /root/terraform-projects/development
# main.tf
module "dev-wevserver" {
  source = "../aws-instance"
  # source = "/root/terraform-projects/aws-instance"
}
In this situation the naming would change. From the perspective of being inside development
- The root module would be
development - The child module would be
aws-instance
Terraform Registry: submodules
module "security-group_ssh" {
  source  = "terraform-aws-modules/security-group/aws//modules/ssh"
  version = "5.3.1"
  # insert the 2 required variables here
  vpc_id = "vpc-7df"
  ingress_cidr_blocks = ["10.10.0.0/16"]
  name = "ssh-access"
}
- Simpler configuration files
- Lower risk
- Re-usability
Creating And Using a Module
Reusable Terraform Module
- Path:
/root/terraform-projects/modules/payroll-appWhere we plan to put all our reusable modules
# app_server.tf
resource "aws_instance" "app_server" {
  ami = var.ami
  instance_type = "t2.medium"
  tags = {
    Name = "${var.app_region}-app-server"
  }
  depends_on = [ aws_dynamodb_table.payroll_db, aws_s3_bucket.payroll_data ]
}
# s3_bucket.tf
resource "aws_s3_bucket" "payroll_data" {
  bucket = "${var.app_region}-${var.bucket}"
}
# dynamodb_table.tf (Fixed values)
resource "aws_dynamodb_table" "payroll_db" {
  name = "user_data"
  billing_mode = "PAY_PER_REQUEST"
  hash_key = "EmployeeID"

  attribute {
    name = "EmployeeID"
    type = "N"
  }
}
variable "app_region" {
  type = string
}
variable "bucket" {
  default = "flexit-payroll-alpha-22001c"
}
variable "ami" {
  type = string
}
Now, on this other path /root/terraform-projects/us-payroll-app
module "us_payroll" {
source = "../modules/payroll-app"
app_region = "us-east-1"
ami = "ami-24e1"
}
In this case we can optionally provide a bucket variable. If not, it will use the default one default = "flexit-payroll-alpha-22001c"
We do not want to change instance_type = "t2.medium" that is why it is hard coded.
Finally we go into a new path /root/terraform-projects/uk-payroll-app
module "uk_payroll" {
source = "../modules/payroll-app"
app_region = "eu-east-1"
ami = "ami-35e1"
}
Note: Complete address example module.us_payroll.aws_dynamodb_table.payroll_db
- Simpler configurations files
- Lower risk
- Re Usability
- Standard configuration
TERRAFORM CLOUD
Software as a Service
- Shared State
- UI Interface
- Secret Management
- Access Controls
- Private Registry: Allows organizations to host their own
Terraformmodules internally - Policy Controls
Terraform Plans
- Free Plan
- Standard Edition
- Plus Edition
- Enterprise Edition
Terraform Cloud Demo
Steps:
- Create
TerraformOrganization - Create a new
Workspaceand connect it to a version control (e.gGitHub) RunsWhere you can see the execution plansVariablesWhere you need to add the variables- Finally
Start New Plan - To delete:
Settings -> Destruction - Any changes made on the repository will be executed on the
Terraform Cloud TeamDefault name isownersRegistrywe can create our own Providers and Modules.
Settings: Policy Sets
Groups of sentinel policies which may be enforced on workspace.
(E.g white list to only allow t2.micro)
Sentinel policies are enforced after the plan, run tasks, and cost estimation phases but before the apply phase in HCP Terraform.